Microsoft Deployment Toolkit
With thanks to the 50 staff from across the University for attending please see below the links to the videos and PowerPoints of the day!
Direct link to Playlist – https://www.youtube.com/watch?list=PLRxbdlgJzwyjAf820T0u4GpP0E01a9LEX&v=u-GVJ_0VuRM
Slides as PowerPoint
 1 Intro (4.3 MiB, 1,565 hits)
2 MDT (85.2 MiB, 1,944 hits)
3 PowerShell (27.5 MiB, 1,679 hits)
4 PRTG Network Monitor (47.5 MiB, 1,753 hits)
5 OpenVAS (32.9 MiB, 1,584 hits)
6 WSUS and Chocolatey (60.3 MiB, 1,797 hits)
7 NPS and VLANs (10.7 MiB, 2,669 hits)
Slides as PDF
 1 Intro (2.0 MiB, 1,688 hits)
2 MDT (2.2 MiB, 2,049 hits)
3 PowerShell (1.8 MiB, 2,159 hits)
4 PRTG Network Monitor (3.2 MiB, 1,610 hits)
5 OpenVAS (2.3 MiB, 1,749 hits)
6 WSUS and Chocolatey (2.9 MiB, 1,971 hits)
7 NPS and VLANs (1.4 MiB, 2,130 hits)
Stay tuned over the coming days for the scripts that are mentioned through the video which will be linked to from this post.
 Not the first time I’ve run into this issue and probably won’t be the last! While building a new Windows Server 2016 (Full) Microsoft Deployment Toolkit server when attempting to run the ‘Update Deployment Share’ wizard I was getting the following error message.
Unable to mount the WIM, so the update process cannot continue.
The solution is simple; if you are running this machine on Hyper-V (presumably other Hypervisors as well) you will need to shutdown the VM, disable Secure Boot (on the VM only) and then power it back on. The next time you run the wizard it will complete as normal.
The error message in full context for reference.
=== Making sure the deployment share has the latest x86 tools ===
=== Making sure the deployment share has the latest x64 tools ====== Processing LiteTouchPE (x64) boot image ===
Building requested boot image profile.
Determining if any changes have been made in the boot image configuration.
No existing boot image profile found for platform x64 so a new image will be created.
Calculating hashes for requested content.
Changes have been made, boot image will be updated.
Windows PE WIM C:\Program Files (x86)\Windows Kits\10\Assessment and Deployment Kit\Windows Preinstallation Environment\amd64\en-us\winpe.wim will be used.
Unable to mount the WIM, so the update process cannot continue.=== Completed processing platform x64 ===
=== Processing complete ===
So first things first….the title of this article is misleading; thus far Avid do not seem to have released a sounds pack specific for Sibelius 8 as you will see on the website when you login in (https://my.avid.com/account/orientation) the only option is for the 7.5 sounds pack. But…this works!
Now deploying Sibelius it’s self in a silent manner is (in my opinion) pretty well documented at this link – http://avid.force.com/pkb/articles/en_US/how_to/en396971.
When you get to the sounds the documentation (again in my opinion) (which can be found here – http://avid.force.com/pkb/articles/en_US/How_To/Installing-and-using-Sibelius-Sounds-across-a-network) is flaky at best not to mention the confusion around version 7/7.5/8.
For example the install path is listed as C:\Program Files (x86)\Avid\Sibelius Sounds\Sibelius 7 Sounds, well Sibelius 8 is x64 only so do we put it in the C:\Program Files folder instead? The registry entry is listed as HKEY_LOCAL_MACHINE\SOFTWARE\Avid\Sibelius Sounds\Sibelius 7 Sounds\ContentPath – well again do we update this to be ‘Sibelius 8 Sounds’?
Well as it transpires their guide is correct in all respects; however, as it states in the clear there is no silent install command for the sounds. Ultimately though its just a copy and paste operation with the addition of a registry key so lets use some PowerShell to get this software deployed! Continue reading

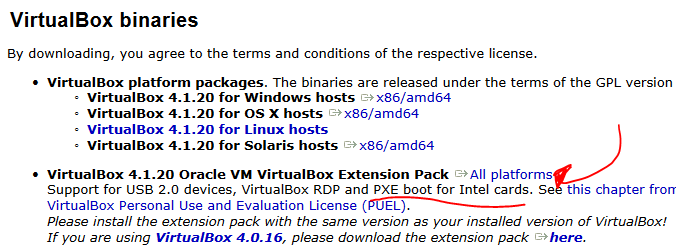
If you have ever tried to boot a VirtualBox VM into PXE (Microsoft WDS/MDT based) using the default Intel PRO/1000MT Desktop adapter you may have seen the error message
FATAL: Could not read from the boot medium! System halted.
The simple solution to this problem (and to get you booting into WDS) is to install the VirtualBox extension pack which can be found on the same download page as the VirtualBox installer (link).
This extension pack includes the required files for boot to continue normaly, a few screen shots are shown below detailing what you need to do.


Has this page helped you? Was it worth the cost of a Coffee? If so click here to donate £1.80 to the myworldofit.net coffee fund via PayPal.