James Preston

When setting up a GlobalProtect Portal/Gateway with AzureAD you may find you receive the error message:
AADSTS700016: Application with identifier <Entity ID> was not found in the directory ‘<Directory ID>’.
The fix here is easy – the GlobalProtect client injects a :443 at the end of the domain name which isn’t mentioned in the guide from Microsoft (https://docs.microsoft.com/en-us/azure/active-directory/saas-apps/palo-alto-networks-globalprotect-tutorial) but is in the guide from Palo Alto Networks (https://knowledgebase.paloaltonetworks.com/KCSArticleDetail?id=kA10g0000008U48CAE).
Interestingly the Reply URL doesn’t specifically require it (although mentioned in the Palo Alto guide) but either way easy to fix.

Having recently moved home I have become a part of the privileged few (hopefully not for long) in the UK to have fibre-to-the-home (FTTH sometimes known as fibre-to-the-premises or FTTP). Not wanting to use the EE provided all in one modem/firewall/router/switch/access point I have a setup that uses the pre-installed BT Openreach Nokia modem (ONT) a pfSense firewall/router along with a Ubiquiti switch and (eventual) pair of Ruckus wireless access points.
From the BT Openreach modem a copper cable (probably Cat6) connects to the WAN interface on my pfSense firewall. EE provide some guides (see links below) that provide some handy pointers but don’t answer all the questions.
EE guide 1 – How do I use my own router for home broadband?
EE guide 2 – What are my home broadband internet settings?
Working out your username (and password)
As described in the guides your username will be in the format PRODUCTIONHQNUN<NUMBERS>@fs after a little bit of poking around the username is the same as the EE account number which can be found at https://mybroadbandaccount.ee.co.uk/b2cselfcare/b2c/myaccount > select your active account > it’s the number in the round brackets.
For example the username based on the (redacted) account number as shown below could be PRODUCTIONHQNUN48123456@fs.

Your password will have been set when you first signed up for Broadband/your EE account (if you have changed your EE account password since first setting it it’ll likely still be the first password set). If you can’t remember this or don’t know it you will probably have to call 150 to see if it can be recovered (or changed).
Plugging it into pfSense
With this information in hand hop into your WAN interface on pfSense and configure as shown below. Firewall/NAT configuration is out of the scope of this guide but the defaults configured in pfSense will normally work well as is.


Having recently setup a Home Assistant server (in getting ready to move home) I’ve been playing with ESPHome as a way to easily integrate my projects into the home.
With a view to make life a little easier for the next person I’ve included some sample config below which can be used with the Waveshare E-Paper ESP32 and ESP8266 Driver Boards (of note are the pin configurations and the platform type for the ESP32).
I’ve also found that as mentioned in the documents the 7.5″ v2 display really does require an ESP32 to drive it even if you’ve managed to get it working with other projects on the ESP8266. Additionally the ESPHome-Flasher tool delivers much more consistent results on an ESP32 when performing the initial flash.
It’s been a while since posting and I do hope to sort that out but for now another quick mention of some work with Ruckus Cloudpath.
Although massively flexible in its design I’ve come into a few niche cases where administrators would like a single DPSK pool (which is bound to a single SSID) but where different users have different expiry dates on those DPSKs. Thus far I’m planning on interacting with the API via Node-RED to update these entries in the API as the provisioning process takes place – something for another blog post.
However for those who are just getting to grips with the API (using PowerShell in my case) I hope the short example in this GitHub repo can be of use: https://github.com/jamesfed/RuckusCloudpathAPI.
Ruckus Cloudpath is quickly turning into one of my favourite add-ons for a wireless network in a residential/University setting. It’s doing this by letting users bring all manner of ‘smart’ devices into an ‘enterprise grade’ network and connect them securely with a personal WPA2 pre shared key.
Even better Cloudpath has loads of options for customizing the onboarding portal – the little tutorial below shows how to change the colour of the font in the footer of the page with a custom CSS file.


You may find that when doing decryption on a Palo Alto Networks Next Generation Firewall that images in Slack channels are not displayed or are only shown in a very low resolution – in addition images cannot be uploaded. When inspecting the HTTP error messages in your browser a 503 response may also be seen.
To top off the issue you may also see that User-ID isn’t mapping traffic from the Slack desktop application against the traffic which negates any User-ID based decryption exception you might have.
While helpful the Slack connection test tool at https://my.slack.com/help/test also doesn’t appear to throw any errors.

To fix this issue you need a decryption exception custom URL rule for the files.slack.com domain (which fixes viewing images) along with the base domain for your Slack tenancy (fixes uploads). This domain can be found by clicking the drop down in the top left corner of the Slack client.
If you have multiple Slack tenancies then you will need an exception for each one.
As always when making exceptions for your decryption policy please consider how it might degrade your ability to detect malicious usage of the network – in this case the sharing of files with unknown payloads.
For more information about Slack network usage visit: https://slack.com/intl/en-gb/help/articles/360001603387-Manage-Slack-connection-issues.

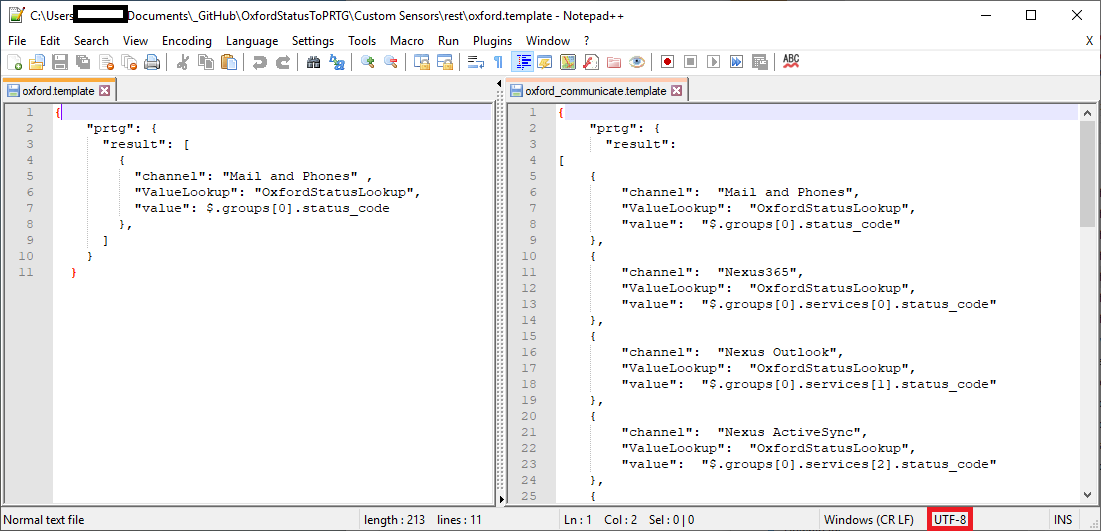
XML: The returned XML does not match the expected schema. (code: PE233) — JSON: The returned JSON does not match the expected structure (Invalid JSON.). (code: PE231)The cause is the default encoding from PowerShell is UCS-2 LE BOM as shown in Notepad++ below.


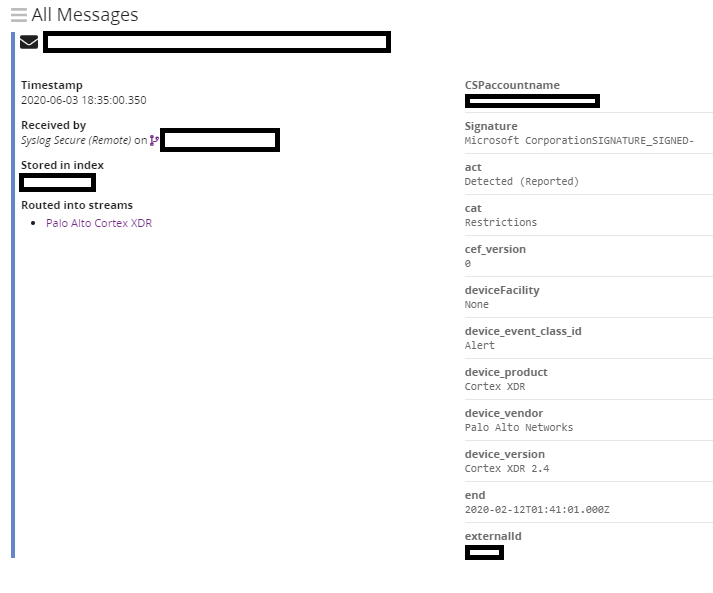 It’s a bit of an odd situation but sometimes you might want to take information from a cloud service in this case Cortex XDR from Palo Alto Networks and drag it into an on premise logging service. This guide will have a look at how to get this log data in as well as parse it such that you can break out the individual fields in the log entry.
In looking at the documentation it appears that the logs are in the Comment Event Format (CEF) but are then wrapped up in syslog for transmission. Although Graylog can absorb CEF directly this additional layer of syslog means we have to take in the syslog and then send the event messages through a processing pipeline in Graylog to extract the CEF data.
So onto the guide – which assume you are familiar with the operation of the Cortex XDR management console and Graylog (shown version is 3.3), for simplicity the code snippet you’ll need is also shown below from GitHub.


A handy trick I learnt recently from this video (ICX Serial Console Server with Raspberry Pi by Terry Henry) which I’ve condensed into this screenshot guide. In short the ‘screen’ command in Linux can be used to turn any device into a serial console server – very handy if you need ‘out of band’ access to the management console of devices. This can be very handy for Firewalls/Routers/Network Switches where a misconfiguration (and forgetting to set a rollback) can lead to the administrators network connection to the device being cut off.
This guide assumes you have some experience of using the Raspberry Pi (although this will work on many other types of hardware) and Linux.


If you are looking to build out Zone Protection Profiles on your Palo Alto Networks Next Generation Firewall then it can be handy to know just what your connections per second metrics look over time for each zone. Quite lucky Palo Alto Networks have a little (although not entirely descript) guide on where you can get this data – https://docs.paloaltonetworks.com/pan-os/9-1/pan-os-admin/zone-protection-and-dos-protection/zone-defense/take-baseline-cps-measurements-for-setting-flood-thresholds/how-to-measure-cps.html.
With that information in hand it was just a matter of time before working out how to collect this data through PRTG so do follow on with the screenshot guide to find out how!
Handy strings:
1.3.6.1.4.1.25461.2.1.2.3.10
[rowidentifier] Connections Per Second
TCP
UDP
Other IP


Has this page helped you? Was it worth the cost of a Coffee? If so click here to donate £1.80 to the myworldofit.net coffee fund via PayPal.